Showing posts with label sewing. Show all posts

Friday, April 13, 2012

Scripture Cover and Bag

Since the end of March we have seen the miracle of reading, yes that magical thing that happens sometime in Kindergarten and first grade. We have been working with miss A all the school year and it finally happened. While visiting Darlette we were reading the scriptures and it was miss A's turn and I told her to try to read and she did. She was so happy and excited that she wanted to keep trying, the next few days she got more excited about reading and I told her if she wanted to have her own scriptures, She said yes! so did miss G so I gave them each her own and I promise to make them a tote to take to Church. I was a few days late from Easter, but since I did not said it was their Easter resent it work out Okay.
I also decided to make them a book cover. I took the girls to the quilt shop and I let them choose one print (they both chose the hot pink fabric) and I complemented them with two more prints.


Happy Sewing

Erika 

Saturday, February 18, 2012

Knit Pants

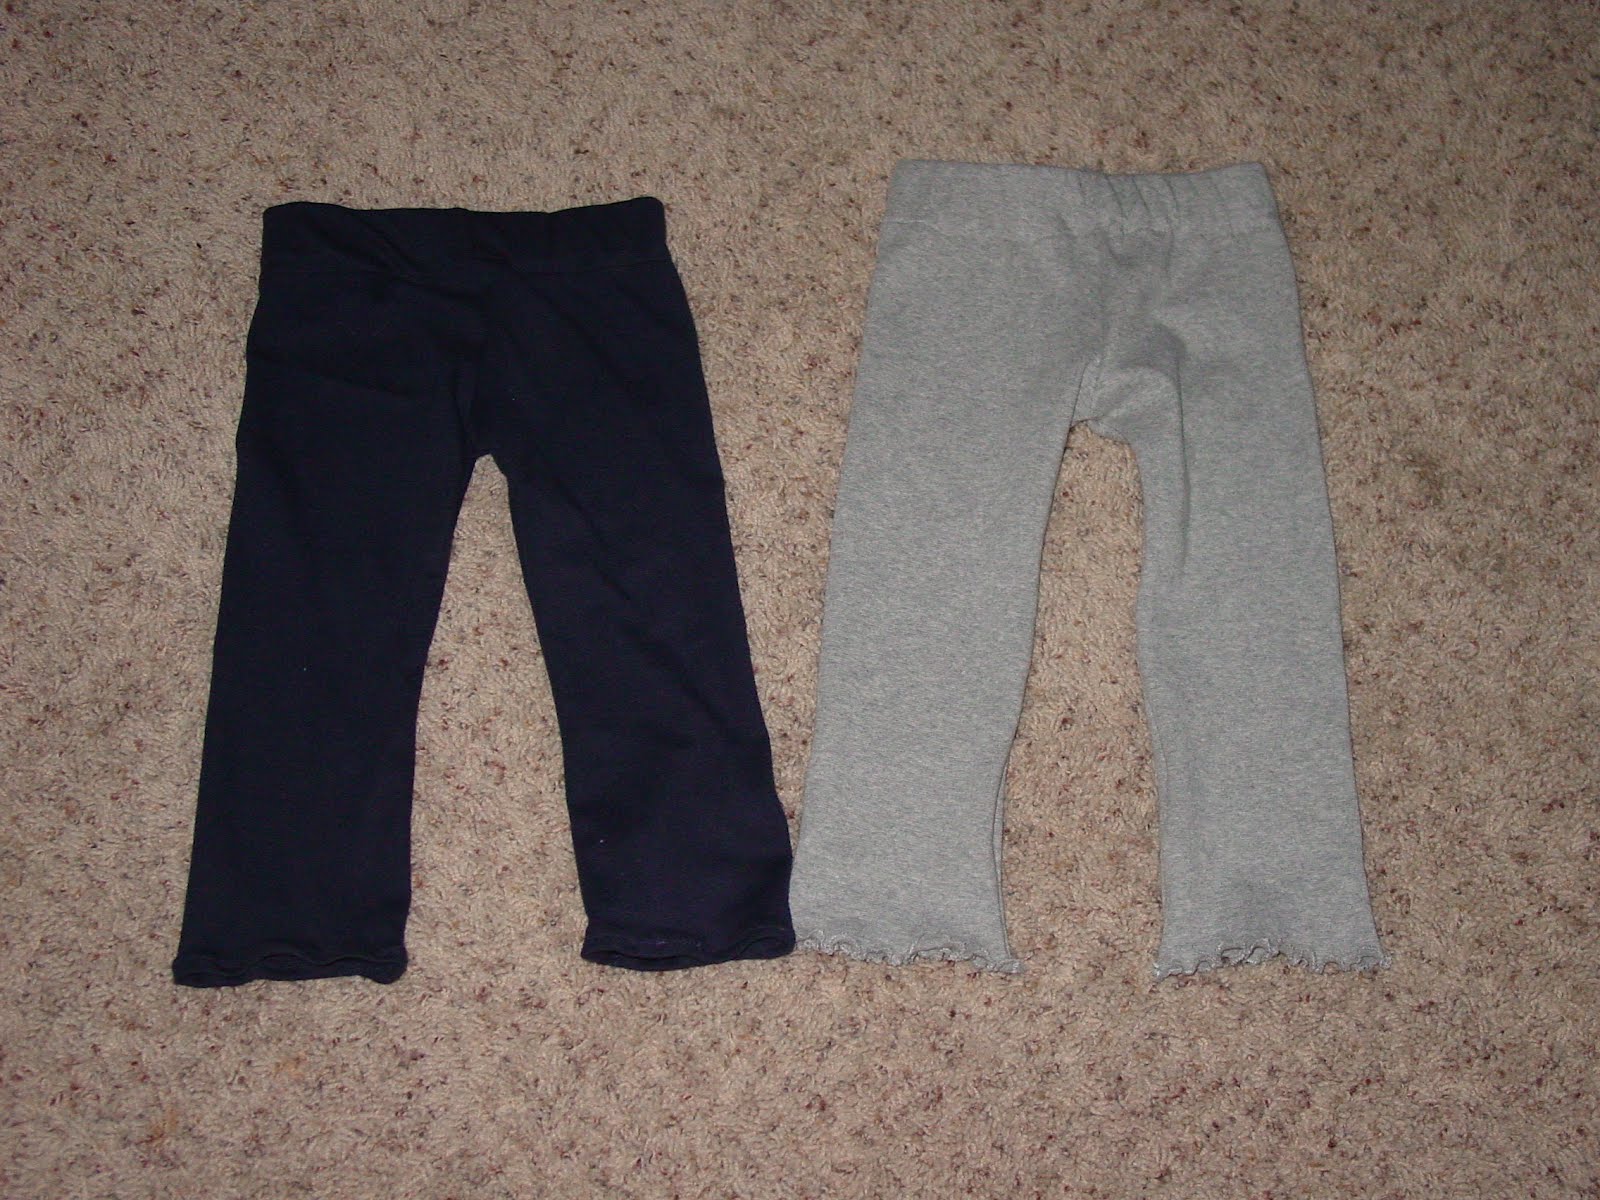
I was waiting for Darlette to post but since she hasn't well here I am. Darlette has told me how great is to sew with knits and she bought some knits at Fabric.com. I wasn't sure, but a friend offered me some knit scraps perfect for little people pants. So I went and found this tutorial it is really easy and I put myself to work.
I made this two for little K and they work just fine. I made four more for miss G and miss A and are just perfect. Now I love working with knits.

Erika

Thursday, February 9, 2012

Potato Baker Bag

I had this kit for a while and last weekend. I finally decided to make it. It is a super easy and fast project if you are making just one. But, when I bought the kit I also bought all the materials to make several more to give as gifts. So That was the reason I did not do it earlier. Anyway I spend Saturday afternoon making them and with the permanent ink and some stamps I made mini tags.Tenia este kit ya desde hace tiempo. Finalmente decidi hacerlo, es un projecto super facil y rapido si haces uno. Pero cuando compre el kit tambian compre todo para hacer muchos mas para darlos como regalos. Asi es que esa es la razon por la cual no lo habia hecho antes. En fin me pase toda la tarde del Sabado haciendolos ademas de hacer unas mini etiquetas con la tinta permanente y unos sellos que tenia.

Have a great day!
Erika

Monday, January 30, 2012

PB Inspired Bakery


When I saw this in PB catalog I got in love of it, but as you can see it is pricy, so I got the idea I could make one for my children. I draw an sketch and use PVC pipes for the frame, and the fabric was from the $1.95 section of Fabric.comI use embroideries from here, here, here and emblibrary.com.

I love to see my children playing with it. They love it.

Have a good day
Darlette

Monday, January 23, 2012

Sewing Machine Mat a Tutorial

I saw a mat for a sewing machine that I like and the lady that had it told me it was just so easy to make so here it is:

I modified, but I will give you the instructions she gave me.

You will only need 1 yard of fabric.
1 Fold the fabric with the right side facing each other sew it all over leaving an opening of about 5 to 6 inches to turn.
2 Press to set the stitch and turn the fabric inside out.
3 pick the corners (I do it with a pin)
4 Press and top stitch around. I press with the seams not at the edge so the seam goes to one side and then when you press on the edge it is easy to have a clean press like the second picture down.
5 You will have a piece that measures about 22'' wide by 36" long.
6 Fold the end of the fabric to measure 7 1/4"and press.
7 Top stitch the sides and then decide how many divisions you want mark them and top stitch them (remember to reinforce the stitch when you start) I went for three separations.
and there you have it.
I hope this tutorial was helpful since I realized that there are a gazillion tutorials for bias tape. anyway.
Have a great Day (I am enjoying the snow here)
Erika

Wednesday, January 18, 2012

Easy way to make Bias Tape – Tutorial-

I have these two bias makers. They work okay, I prefer the pink kind but it just works when you make the 18mm size. Then one day a friend taught me an easy way to make bias tape without fancy gadgets.

Tengo estos dos aparatitos para hacer bies. Funcionan bien (prefiero el rosa) pero se limitan al tamaño que pueden hacer (18mm y 25mm). Un dia una amiga me enseno como hacer el bies sin ninguno de estos aparatitos.

NOTE; this is the way I learned how to do it (I am self thought). You may have a better way to do it.

NOTA: esta es la forma en la que yo hago el bies (aprendí solita). Talvez tu tengas una mejor forma de hacerlo.

First of all you need to calculate how much bias you’ll need. Measure the perimeter of your quilt (each size) so if you quilt is 60” x 70” you will add 60 + 60 + 70 + 70 = 260” add 10” for a total of 270” that will help to sew it on the quilt.

To calculate how much fabric you’ll need I calculate the following:

Considering the width of fabric as 42” or 110cm and the width of the desired bias (in this case 1 ¾ this is the width I usually do my bias) I divide 270/42 It will give me how many strips I’ll need for a total of 6.42 ~ 7 strips times the width of the bias (1.75) = 12.25” Rounding up we’ll need 13” in other words:

Sides of quilt A+B+C+D= E Total perimeter of quilt

E+ 10= F Total inches of bias needed

F/42 (width of fabric) = G Number of strips

G*(width of bias strip) = inches of fabric you need

Lo primero que necesitas es calcular cuanto bies necesitas. Mide el perímetro de tu acolchado (cada lado). Si tu acolchado mide 150 cm por 180 cm vas a sumar 150 + 150+ 180+180= 660 cm agrega 25 cm mas para un total de 685 cm esos 25 cm te ayudaran a terminar de agregar el bies al acolchado.

Pata calcular cuanta tela necesitamos vamos a calcular lo siguiente:

Considerando que la tela mide 110 cm de ancho y el ancho del bies 4.5 cm (este es el ancho que yo normalmente utilizo) dividimos 685/110 que nos dara la cantidad de tiritas que es 6.22 lo redondeamos a 7 tiritas por el ancho de las tiritas (4.5cm) = 31.5cm redondeado 32cm.

So with your measurements done, cut the strips in my case 1 ¾. Sew all you pieces on the width right sides together and press open the seams. (I do this to diminish bulk).

Con todas las medidas calculadas, cortamos tiras de 4.5 cm (en mi caso) coser las tiras a de la parte delgada con los derechos juntos y planchar las puntadas abiertas (esto es para que no tengamos mucho bulto)

Next finger press on half just the first few inches.

Despues con las uñas marcar la tela a la mitad.

Press the fold.

Planchar el doblez (unos 10 cm)

Open and again fold it the edges towards the middle.

Abrir otra vez, doblar la tela hacia el centro por los dos lados.

And press, this is just to the first few inches

Planchar, solo unos cuantos cm.

First on your ironing table (I cannot do this on my small Teflon cover tableL) pin from edge to edge as shown.

En el burro de lanchar (o tabla) Pinchar como se puestra en la foto justo a la orilla del bies.

Make sure it does not have room to make the bias wider (I hope the pictures are self explanatory

Y Pinchar a la otra orilla del bies asegurarse de que no sea mas ancho para que el bies sea uniforme todo lo ancho. (espero que las fotos sean mas explicitas que mi explicación)

Pull just enough tape to have the iron on and enough so you can pull the end with your fingers (sorry for the crappy pick). Keep pulling and help feed the tape under the iron with your other hand (I usually do not need to press the iron I just leave it there and pull the tape.

Jalar suficiente bies para que la plancha pueda ser puesta y suficiente para jalar (lado derecho) con la mano. (Lo siento por la mala foto). Seguir jalando y pasando el bies por debajo de la plancha. Ayuderse con la otra mano para que el bien siga pasando por el pin y la plancha.

And there you have it Bias tape to be bind. (Sorry, I did not make lots of this bias it was for the sewing machine cover top)

Y aquí lo tienen bies listo para poner (lo siento no hice mucho bies de esta tela pues la utilice para la cubierta de mi maquina de coser.) Espero que este tutorial haya sido de ayuda si tienen algún comentario o pregunta no duden en preguntarme.

I hope this tutorial was helpful.

Cheers

Erika

Monday, January 16, 2012

Sewing Machine Cover

Have this happened to you? You want to make something very special but you are afraid you are going to hate it if you do. This is what happened to me every time I thought about making a sewing machine cover. so I thought and I thought and the idea came in black and white and later evolved to this:
I got the bunny Hill fabric as a scrap piece it was enough to do this. I just love it! with all my previous circle quilting practice on my last project I was kind of confident to try to do this flowers like Laurraine Yuyama that I love. Then as I was looking on her Flickr site i found that by cover has some of her influence. To each flower I added a button to make it different.
I do not think I will get tired of it, but if i do, I just turn it outside in and I'll get a totally different look.
Cheers,
Erika

Wednesday, January 4, 2012

Not so good of a Day


Yesterday wasn't my day at all. Doing house work going up and down stairs one of those trips I badly landed and my hips and leg hurts. After that I decided to slow down and finish working on my quilt. I did finished the free motion quilting and I switched to add the bias when I switched something happened and my sewing machine jammed. Today Hubby send it to the doctor and it will be back in a week. He called me and said that he arranged for me to have a temporary sewing machine from the shop. I am happy and sad. I am so attached to my sewing machine... silly? I do not think so, when you love what you do you really get attached to your tools.

Ayer no fue mi dia. Estaba trabajando en las labores del hogar, subiendo y bajando las escaleras cuando termine en el piso, me cai y me duele mis caderas y una de mis piernas. Despues decidi tomare el resto del dia mas tranquilo y me puse a terminar un acolchado. Termine el free motion parte y cuando cambie mi maquina para hacer el bies algo paso que mi maquina se trabo y nada que se mueve. Totalmente debastada, lo bueno es que mi esposo llevo mi maquina a que la repararan, estara alli por una semana. Lo bueno es que mi esposo me traera una maquina temporal.
Saludos
Erika

Wednesday, December 28, 2011

Twins Dress


I made a dress for the twins, the same design i made for miss G.
Darlette says the girls like them. I am glad, my girls love the fabric.
Cheers,
Erika

Wednesday, December 7, 2011

Doll Beds


Darlette made this beautiful doll beds to give her girls for Christmas. She just show them to me and I ask her if I could share with you. They are just beautiful!
Darlette hizo estas lindas camitas para muneca para regalar a sus ninas en la Navidad. Me acaba de mostras las camitas y le pregunte si podia mostrarselas y dijo que si, creo que estan simplemente lindas.
She made the mattess, Sheets and quilt I think they are adorable.
Ella hizo los colchones, savanas y colchita, estan adorables.

She got the idea and plans from here.
Ella encontro la idea aqui.
A funny story is that when we were in middle school I took wood shop class and Darlette Accounting. Last week mom call me and asked me what I was doing I said "doing the books for Hubby" then she called Darlette and mom asked the same question, Darlette answered "woodwork." Mom laugh the accountant is doing woodwork and the carpenter is doing accounting. Darlette clarify, "yes but Erika studied accounting in College, and I am just trying first time." I think she did great considering it is her first time.
Una anegdota sobre esto es que cuando estudiabamos en la Escuela Secundaria yo estudie carpinteria y ella contabilidad. el otro dia mama hablo y me pregunto que que hacia y le dije "haciendole la contabilidad a mi Esposo", despues ella le llamo a Darlette y le pregunto lo mismo y ella contesto "haciendo las camitas para mis hijas" mi mama se rio y dijo "mira la carpintera esta haciendo contabilidad y la contadora carpinteria" Darlette le aclaro, "Si pero Erika estudio contabilidad en el Collegio y yo apenas estoy aprendiendo carpinteria" En fin creo que le han quedado hermosas las camitas.

Anyway as I said I am working on Hubby's business and I haven't done much crafting that I can show you right now. Hopefully soon I'll be free.
For now...
Enjoy the Holidays!
Erika

Saturday, November 19, 2011

Believe Banner

How ironic my last project took me 3 years to finished and this only 3 hours. Today it was super Saturday in my Church and we had several projects going on. I choose the banner. The sample had the Sweetwater girls, but since I am doing my Christmas decorations more focus on what Christmas is really about. I decided to go with a different line of fabric, I went with Fa la la la la, from Moda French General. At first I was afraid I wont like it but it is official I am a French General gal. I think they fit my style. I just love it and the fabric is not to Chistmas-y.

Que ironico mi ultimo projecto de ayer me tomo 3 anos en terminar y este solo tres horas. Hoy hubo un Super Sabado en mi Iglesia e hicimos varios projectos, yo decidi hacer este banner, es super sencillo. El ejemplo que tenian estaba hecho con la linea de las chicas de Sweetwater pero como he decidido hacer mis adornos mas enfocados en lo que la navidad realmente representa decidi irme por la linea de las chicas de French General, su linea de navidad Fa la la la la. Al principio no estaba muy segura si me hiba a gustar pero ya es oficial me encanta su estilo y es el mio. La tela no es muy navidena pero funciona perfectamente bien. Por cierto aveces no tengo el tiempo de escribir el blog en Ingles y Espanol y tomando en cuenta que tengo un traductor en uno de los lados... bueno gracias por comprenderme.
Saludos.

Erika