


Algunas personas han mostrado interes en aprender como hacer el abanico de la Abuela y bueno pueden decir que este es un tutorial. espero que pueda explicarlo bien y que tengan un abuena idea de como es. Sorprendentemente este acolchado esta siendo mas rapido de lo que pensaba. les ensenare como lo hice y ya ustedes lo pueden acomodar segun sus necesidades.
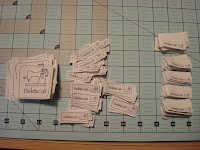
1.First I cut my fabric 8 in x width of fabric, trim edges and then use the template one cut up and one down. I had 17 different pieces of fabric so it was a lot of cutting around. 

1.Primero corte la tela en tiras de 8 in por el
ancho, corte las orillas y luego use el patron
corte hacia arriba y el siguente hacia abajo
Now you have all your wedges cut and you sew 

Ahora tenemos todas las cunas cortadas y las unimos dos cunas unidas por el lado derecho, yo las cosi en cadena para hacerlo mas facil cosi 3/4 partes de las cunas para hacer grupos de dos cunas y luego las uni dos grupos juntos para lograr grupos de cuatro y finalmente unir la ultima cuna al set de cuatro para asi lograr el abanico.
2. Next to attach the quarter circle for the fan.
2. Next to attach the quarter circle for the fan.

My pattern has one that is 1 3/4 in wide. Set the piece right sides together as shown in the picture make sure it is matched to the side so it can be in the correct angle.
Ahora unimos el cuarto de circulo al abanico. en mi patron el tamano del radio es 1 y 3/4 de pulgada. Poner las piezas lados derechos juntos y como se muestra en la foto las curvaturas juntas y en linea con el abanico.
We set the pieces in our sewing machine as shown in the picture with the quarter circle on the bottom(picture 1). Make a couple of stitches to hold the pieces(picture 2) and then with your hand help the fan piece to angle acording to the quarter circle curve (picture 3)
Ponemos las piezas juntas en la maquina de coser como se muestra en la foto con el cuarto de circulo hacia abajo(foto 1). Hacer un par de costursa para asegurar las piezas (foto 2) y luego con las manos ayudamos a la pieza de abanico a segur el angulo del cuarto de circulo (foto3).


We wil have a piece like this seen on the wrong side and pick every 1/4 of inch after that we press and it will lokk like this:
Nos quedara un abanico como se ve en la foto siguiente vista por el reves y se corta mas o menos cada 3/4 de cm para que al plancharlo quede plano como se muestra en la foto de abajo. 


To Make the top side of the block we locate the center of the fan by folding in a half and pin it (picture 1)then pin with the top part. follow the curve and pin the ends like in figure 3
Para hacer la parte de arriba del abanico se sigue el mismo procedimiento solo que para alinearlo primero localizamos la parte media del abanico (foto1)y ponemos el otro templete que a que se alinen fijados con un alfiler.  y seguimos la curva del abanico y al final se sujeta con un alfiler.
 y seguimos la curva del abanico y al final se sujeta con un alfiler.
Put the block on the sewing machine and again a couple of stitches to secure the block and then with our hand we help the fan to match with the curve of the top part.
Lo ponemos en la maquina las telas con el derecho juntas y el abanico hacia arriba igual le damos unas dos puntadas para fijarlo, he igual ayudamos a el abanico con las manos para que se una a la curva de la pieza.


At the end you will have to click the seam to make it flat, then press and you have your grandmothers fan all machine stitch.
Al terminar igual que con el cuarto de circulo se hacen unos pequenos cortes a la orilla para que quede plana el block, se plancha y listo quedo el abanico de la abuela hecho totalmente a maquina.


I hope I could help you and you can meke some.
Espero que les sirva y se animen a hacerlos.
Happy quilting
Erika


2 comments:
Bravo!
por in el ansiado tuto de los abanicos!
entendí claritas las instrucciones me faltaría ponerlas en práctica, me pondré a juntar telitas...
besotes y mil gracias
vero
Felicidades , muy bueno tu tutorial!!
Post a Comment