Inspired by
PB Kids I made this Chair Backers for my Girls .
Inspirada por PB Kids Hice estos bolsas para el respaldo de las sillas de mis hijas. 
I was looking for a nice green shade of felt, but all I found was not cute enough for Easter so I looked at the Home Decor section at Joann and I found this 45" polka dot fabric that my helper (Miss C) loved.
Primero busque por fieltro verde pastel pero no encontre ninguno que me gustara asi que en la seccion de telas para decoracion del hogar encontre esta tela de 45" con lunares en tonos pastel que mi querida alludanta le encanto.
To make 3 you will need:
1 yard Felt or home decor weight fabric 45"
1 yard fusible thermolam plus felt from pellon
Ric rac trim or any other trim ebmelishments you want to use.
If you have an embroidery machine a nice good quality embroidery. I love this from
emblibrary it is one of my favorites. Stitcheries can be used too.
If not, any Easter fabric for applique will do.
Thread
2 buttons
a little piece of fusible net
Card stock to make a template.
Para hacer 3 bolsitas necesitas:
1 yarda (91cm) de tela de 45 " de ancho o fieltro
1 yarda de fieltro fusible
Espigilla de colores o cintas para decorar.
Si tienes una Maquina bordadora busca un bordado de buena calidad. A mi me encantan los bordados de Emblibrary son de mis favoritos.
Si no, busca tela con motivos de Pascua con la que puedas hacer aplicaciones. O algun bordado a mano.
Hilo
2 botones
un pedazo de cinta fusible
Y carton o cartulina para hacer el molde.

As you can see I use a big box of Ritz crackers.
Como veran yo use una caja de galletas ritz para reutilizar el carton. 
I measure the back of my chairs 13" by 15"tall so that was my limit.
With the help of two plates I made the shape of an egg. an Oval one for the bottom and a round one for the top.
Primero medi el respaldo de mi silla que midio 13" de ancho por 15" de alto y esoas fueron mis medidas limite para mi molde. Con la ayuda de un platon ovalado hice la parte de abajo del huevo y con un plato mediano hice la parte de arriba del huevo.
After that, I join the curves with lanes trying to shape an egg.
Despues uni las marcas que habia hecho con lineas tratando de hacer la forma de un huevo.

I make some marks for my pocket 3" down the top and from them I add 1" to the edge of the fabric to fold later.
Hice algunas marcas para la parte de mi bolsa a 3" de la orilla de ariba de mi huevo y despues a la tela le agrege una pulgada para que despues se doblara para formar la orilla de la bolsa 
These is the top of the egg front and is 2" down the last mark so when you open the pocket you still see "lining"
Aqui tengo la pieza que va en la parte de arriba del frente de mi bolsa y es 2" mas larga abajo de la marca anterior para que de esta manera cuando se abre la bolsa se siga veindo parte de la tela.
And this is the backing of the egg. Make sure you flip your template for the backing because is posible your template is not 100% symmetric.
Esta es la parte de atras de mi bolsa. Asegurate de boltear el molde alrevez para marcar tu tela ya que lo mas seguro es que tu patron no sea 100% simetrico.
For the baking cut a piece of fusible felt using your fabric. remember too have the fusible part right side up touching the wrong side of your fabric. and fuse.
Para la parte de atraz corta una pieza del fieltro fusible asegurandote que la parte donde tiene el pegamento este hacia arriba tocando la parte de atraz de tu tela y fusionala como en las instrucciones del fieltro.
With the pocket side do the same after you embroidered.
Con la parte de enfrente de la bolsa haz lo mismo despues de hacer tu bordado. 
Embellish as you desired. I did this after I fuse the felt to secure the felt but it is up to you.
Decora como mas te guste. Yo hice esto despues de fusionar el fiueltro porque de esta manera me aseguro que el fieltro esta bien seguro pero es cuestion de gustos.
I love Ric rac so I play with different colors and sizes. You can found nice Japanese
Ric rac here.
A mi me gusta mucho la espiguilla asi que utilice diferentes colores y tonos y diferentes anchos para mis bolsitas. Pueden encontrar espiguilla de rayon Japones aqui.
With the left over of your fabric cut 2" stripes to make the stripes to hold on the chairs. depends on your chair is going to be the length of your stripes. You need 4 for each one. Sew it together and turn it out and iron. Fold in one of the ends an sew the ends. Now you can make a button hole.
Con los pedazos de tela que les sobren corten 4 tiras de 2" de ancho cada una por caba bolsita que hagan para hacer las tiras para sostener la bolsita en las sillas, el largo dependera de tu silla. Cose las orillas largas de tus tiras y boltealas al derecho planchalas y luego de una el las puntas doblala un poco hacia adentro y cose la orilla. Ahora puedes hacer el hojal para pur botones.
I free motion quilt the names of my girls just because I want it to be there but not to be the focus point so it is a light embellishment.
I fold the top of the pocket fabric and top stitch it.
Yo puse los nombres de mis hijas enla pieza pequena de arriba de mi bolsa haciendolo con el metodo de acolchado libre en la maquina de coser cara que estubiera alli pero que no fuera un foco de atencion de mi bolsa. tambien lo puedes hacer a mano.
Despues doble hacia abajo la parte de arriba de la pieza de la bolsita y la cosi para asegurarla.


So now to put together everything together. First place the baking right side up and pin the holding stripes.
Ahora es tiempo de armar la bolsita. Primero se acomoda la parte de atraz con la tela hacia arriba y se aseguran las tiras con alfileres.
Then, the Pocket piece right side down.
Despues encima se pone la pieza de enfrente de la bolsa con el bordado o aplicacion boca abajo asegurandola con alfileres.

And finally on top the little top piece of the egg. Pin and sew all the way around about 3/4".
Finalmente se acomoda la pieza pequena de la parte de arriba del huevo con la parte de enfrente boca abajo. asegurala con alfileres y coce todo alrededor con una costura de 1cm de ancho a la orilla.
Clip all the curves.
Corta las curvas.
Now turn the top first and with the help of a paper folding tool help yourself to push the fabric. First I use my iron with stem once and then I push the fabric from inside and then I press again until all the seams are nice even and out.
Ahora bolte primero la pieza pequena de arriba del huevo y con la ayuda de un doblador de papel empuja por dentro la tela, primero usa tu plancha con vapor y pasala una vez y asi caliente empuja la tela por dentro con tu doblador de papel asi hasta que loda la costura quede pareja y lo mas afuera que se pueda. 
Then I turn the pocket and do the same process.
Ahora boltea la parte de la bolsa y haz el mismo procedimiento.

Because I have a raw edge on the top of my top I fuse a piece of fusible net to my fabric so it will stay in place. I didn't lined my backer because I didn't had enough of the same fabric, and it is just a decoration that is going to be on the chair for a month, And originally it was suppose to be all felt.
Como tenemos una orilla que no esta escondida usaremos un pedazo de deta fusible para unir la tela con el pellon y mantenerla en su lugar. En esta ocacion no puse forro completo a este proyecto porque en primera no tenia suficiente tela para la pieza y en segundo lugar porque el proposito de la bolsa es solo decoracion que durara un mes en la silla, finalmente la ide iriginal era hacerlo con puro fieltro.
So now I took the backer to the chair and mark the place where I sew the buttons.
Ahora agarras tu bolsita y la mides en tu silla para marcar donde pondras los botones paqra asegurar la bolsa a la silla.


All done. Now you need to fill it with lots of love and goodies for your children or grand children on Easter time.
Ya terminamos, ahora lo que necesitas es llenar tus bolsitas con mucho amor y regalitos para tus pequenitos o tus nietos esta proxima Pascua. Enjoy it.
Espero que lo hayas disfrutado.Please if you use this tutorial or link it to share with others let us know.Porfavor si usas este tutorial o lo compartes con otros asegurate de hacer el link a nuestro blog. Darlette






 Tenia este kit ya desde hace tiempo. Finalmente decidi hacerlo, es un projecto super facil y rapido si haces uno. Pero cuando compre el kit tambian compre todo para hacer muchos mas para darlos como regalos. Asi es que esa es la razon por la cual no lo habia hecho antes. En fin me pase toda la tarde del Sabado haciendolos ademas de hacer unas mini etiquetas con la tinta permanente y unos sellos que tenia.


 I am still quilting my other project(a massive queen size quilt). Hopefully I'll be done this weekend to show it to you!


 Here is a picture of a detail.
 Hace algunas semanas me encontre este tutorial y me gusto mucho. Por alguna razon perdi el enlace y buscando el tutorial me encontre muchos tutoriales similares pero nada como este. Hice uno (no foto) con tela de navidad que quedo lindo, use tela de la de Joann. Como queria algo mas para decorar con colores del otono busque todos los retazitos de tela que tenia de color calabaza; los mezcle y estas tres pinitas salieron. Me gusto como lucen y que elegantes se ven. No estoy segura cuanta tela use pero parece que es como un cuarto de yarda.


 Cheers,

 I was looking for a nice green shade of felt, but all I found was not cute enough for Easter so I looked at the Home Decor section at Joann and I found this 45" polka dot fabric that my helper (Miss C) loved.
 To make 3 you will need:
 As you can see I use a big box of Ritz crackers.
 I measure the back of my chairs 13" by 15"tall so that was my limit.
 After that, I join the curves with lanes trying to shape an egg.
 I make some marks for my pocket 3" down the top and from them I add 1" to the edge of the fabric to fold later.
 These is the top of the egg front and is 2" down the last mark so when you open the pocket you still see "lining"
 And this is the backing of the egg. Make sure you flip your template for the backing because is posible your template is not 100% symmetric.
 For the baking cut a piece of fusible felt using your fabric. remember too have the fusible part right side up touching the wrong side of your fabric. and fuse.
 With the pocket side do the same after you embroidered.
 Embellish as you desired. I did this after I fuse the felt to secure the felt but it is up to you.
 I love Ric rac so I play with different colors and sizes. You can found nice Japanese Ric rac here.
 With the left over of your fabric cut 2" stripes to make the stripes to hold on the chairs. depends on your chair is going to be the length of your stripes. You need 4 for each one. Sew it together and turn it out and iron. Fold in one of the ends an sew the ends. Now you can make a button hole.
 I free motion quilt the names of my girls just because I want it to be there but not to be the focus point so it is a light embellishment.


 So now to put together everything together. First place the baking right side up and pin the holding stripes.
 Then, the Pocket piece right side down.
 And finally on top the little top piece of the egg. Pin and sew all the way around about 3/4".
 Clip all the curves.
 Now turn the top first and with the help of a paper folding tool help yourself to push the fabric. First I use my iron with stem once and then I push the fabric from inside and then I press again until all the seams are nice even and out.
 Then I turn the pocket and do the same process.
 Because I have a raw edge on the top of my top I fuse a piece of fusible net to my fabric so it will stay in place. I didn't lined my backer because I didn't had enough of the same fabric, and it is just a decoration that is going to be on the chair for a month, And originally it was suppose to be all felt.
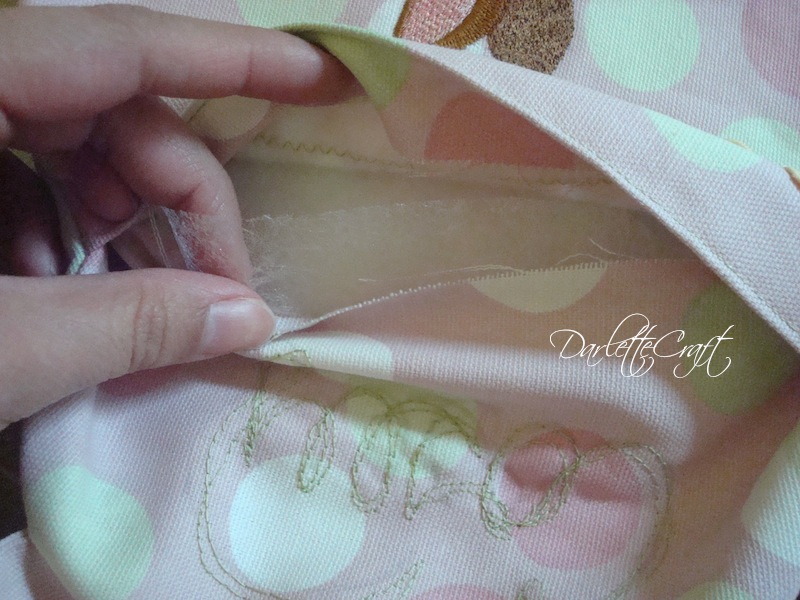 So now I took the backer to the chair and mark the place where I sew the buttons.


 All done. Now you need to fill it with lots of love and goodies for your children or grand children on Easter time.


