


First of all I am going to show you how to hide the upper thread:
 On the picture above you can see the beginning of our machine stitch and we are going to hide it on the wrong side of the fabric.
En la foto de arriba se ve el hilo de costura que vamos a esconder en la parte de atras.
 Facing the wrong side of the fabric pull a little bit the bobbin thread, enough to see a little loop (which is the top thread)
Viendo la tela por la parte trasera jalar el hilo de la bobina un poquito, lo suficiente para ver un pequeno lazo (que es el hilo de arriba)
 You can see the loop I hold with the pin and then pull it out.
Con un alfiler jalar el lazo y sacarlo.
 You have now the two threads on the same side and you can tide a knot and cut the excess. You can do the same when you start quilting you bring the bobbin thread up, you leave it out till you are all done with your quilt and then with a hand needle you hide them in between the quilt sandwich.
 Ahora tienen los dos hilos en el mismo lado de la tela, ahora pueden hacerle un nudo y cortar el resto. Este metodo tambien se puede usar para cuando uno comienza a acolchar se hace al reves, ponemos el hilo de la bobina hacia arriba y dejamos los hilos hasta que terminamos de acolchar y despues los escondemos entre el sandwich del acolchado con una aguja para coser a mano.

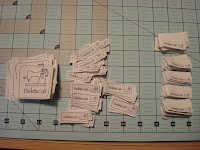
Now that we applique all the pieces we are ready to prepare the runner to quilt:
Ahora que nuestros appliques estan listos podemos comenzar a preparar el camino de mesa para ser acolchado.

We are going to make our quilt sandwich cutting a piece of batting of your preference (I use Warm and Natural). Cut it two inches bigger than your TR (14" by 46"). Now lay the two pieces (batting and top) on the backing and cut it again two inches bigger (16" by 48") This is with the intention of not running out of fabric when you quilt it and everything is covered. In this case it will be one and two inches from the top edge because is a small piece, if you are making bigger quilts 3"-5" are recommended.
Vamos a hacer el sandwich para acolchar cortando una pieza de relleno de su preferencia (yo use Warm and Natural) Cortarlo cinco cm mas grande ue nuestro camino de mesa osea (35.5X 115cm). Ahora poner las piezas de relleno y el top en la tela para atras que igualmente sera cinco centimetros mas grande (40.5X120 cm). Esto se hace para no nos falte tela a la hora de acolchar que muchas veces la tela se jala y podemos terminas sin suficiente tela trasera o relleno. estas medidas son para acolchados pequenos pero para acolchados grandes se recomienda incrementar el exceso de tela de 7.5 a 12.5 cm.

Next is the pining, I pin about 4 to 5 inches apart You can also spray baste. I did it all on my table because the runner is small and does not require the usual battle to keep it all straight.
Ahora es el turno de los seguros los he puesto de 10 a 12 cm de espacio, tambien se puede usar el spray para asegurar. Todo esto lo he hecho en mi meas de trabajo, pues con una pieza tan pequena no tenemos que batallar como con los acolchados grandes para mantenerlos lisos.

 You are now ready to have fun quilting! I try to edit my pictures to show you some ideas of how can we quilt this runner, but it did not work so I ended with my second best option the white board:
Ahora estamos listas para divertirnos acolchando! Trate de editar mis fotos para mostrarles algunas ideas de como acolchar el camino de mesa, pero no me funciona asi es que use mi segunda mejor opcion, el pizarron blanco.
 I mention I am going to make a double margin on the edge on my quilt at 1" and 1 1/2" from the edge of the runner. On the above picture I marked the double margin and then a stippling all over the piece except the applique area. I did mention yesterday that even if you do not have a quilting foot you can do the free motion quilting by removing the presser foot and lowering the feed dogs. I know Darlette has done it before and it works. just practice before you start so your tension is right.
Mencione antes que pondre un margen doble de 2.5 cm y 3.75 cm alrededor del camino de mesa. La foto de arriba muestra el margen y el diseno stippling por todo el camino de mesa con exepcion de los dulces de maiz. Ayer mencione que se puede hacer acolchado libre sin tener el pie para hacerlo, simplemente remover el pie de costura y bajar los dientes de arrastre. Se que Darlette lo ha hecho y funciona, solo deben de practicar antes para ajustar bien la tension.
 This second one is just about making echoes on all over the candy corn, you can also do an echo spiral it looks beautiful and this one you can make with a normal foot using the edges of the foot as guidance for a straight distance between ecoes.
Este segundo diseno es simplemente hacer ecos alrededor de lo appliques, luce muy lindo. este tipode acolchado tambien se puede usar con pie normal y usando la orilla del pie puede uno guiarse para mantener la distancia entre los ecos.
 This next one is a combination, making two or three echoes and the rest filling with stippling.
Este siguiente es una combinacion de dos o tres ecos y el resto rellenarlo con stippling.
 This next one is about one echo or just quilt on the edge of the applique and the rest straight lines all over also sutable for normal foot.
Este siguiente es un eco o acolchar alrededor del applique y el resto lineas rectas, este tambien es un diseno en el que se puede usar un pie normal.
 This last is a last minute inspiration combining stippling with little candy corns I think I am going to use it I do not know. You will see the finished product on Monday when I sow you the finish runner. till then...
Este es mi inspiracion de ultimo momento combinando stippling con unos pequenos dulces de maiz, creo que asi lo acolchare pero todavia no me decido, ya veran como me queda el Lunes que regrese para mostrarles mi camino de mesa terminado. ahasta entonces...
Make it a great weekend!
Erika


No comments:
Post a Comment