Wednesday, November 14, 2012
Reason
Please visit her I understand she will have a giveaway or something.
Erika
Wednesday, May 16, 2012
Tuesday, May 8, 2012
Is it been that long?
A couple of weeks ago I sign up to decorate Miss A's teacher door as Appreciation Week. Since our elementary school is the house of the super stars I decided to go with the same theme. I came up with this:
and a friend of mine did this for her son's teacher:
I also made star cookies, but silly me I forgot to take pictures oh well life happens.
Erika
Saturday, April 21, 2012
Thank you Dr. Seuss...
Thank you so much for your books, my kids love them. Their favorite part is when Daddy reads to them because he puts such an effort, I think just the way you intended it to be.
Our new best time favorite is Green Eggs and Ham especially for Miss A. She is just starting to read. For me it was hard at first and I really thought it was a great tongue twister for non- English speaking born peeps just like me, but this week I saw the light, yep everything was clear. Dear Miss A said:
"I'll read to you (Miss G feeling sick) Green eggs and ham"
I said: "How come? You cannot read that? It's too long, you know?"
"Yes, I know" She answered, "but it has all my sight words, so I can read it all day long."
So she did, she read it all by herself to little Miss G accompanied by Miss K...
So you see Dr. Seuss, you have made this momma proud for I have a little one that wants to read, tongue twisters to me, yet so fluent to her.
Now I know it is not for me, but for little readers just like Miss A.
Sincerely,
Miss A's, Miss G's and Miss K's proud Momma
Friday, April 13, 2012
Scripture Cover and Bag
I also decided to make them a book cover. I took the girls to the quilt shop and I let them choose one print (they both chose the hot pink fabric) and I complemented them with two more prints.
Happy Sewing
Erika
Thursday, April 5, 2012
QR Code Wall Hanging Quilt Along: Quilting, Binding and finishing Wall quilt.
First I am going to talk about the back.
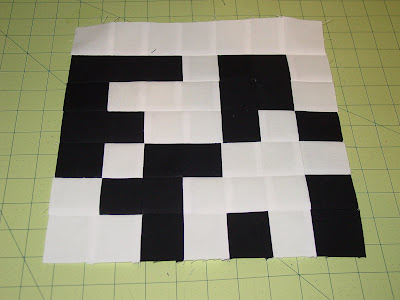
I decided to make it a bit interesting so I made a block with this design:
just a black square in the middle with white around and another border of black. I did it with the leftovers I had at hand.
then I added a couple of more squares:

Next I pinned about every other square
Now for the quilting since it is a modern design I did a minimal design, lines. Now I had a few options, just straight lines (like I did on the Tokyo Subway map quilt) , diagonal lines or a echo circular design.
I went for the diagonal lines and here is how is finished binded
Here is how the back looks on the back. You can see I should have planned better for the rod
Well I hope you like it
Erika
Friday, March 30, 2012
Little hands

Have a great Friday
Erika
Thursday, March 29, 2012
QR Code Wall Hanging Quilt Along: Blocks 9 and Finishing Top

Finished

Finishing Top:
Square up all the blocks. there should be 11"
The order of the blocks are as follows:
when you piece all the blocks together you will have something like this:
Then add to the top the 1" sashing. you can put sides first and top and bottom next. This is the end top, as you see the sashing or border is small enough to make a distinction on the QR Code design:
This is the top finished, Next week I will show you my idea for the back, how I quilted it and how I finished.
Til' then
Have a wonderful Day!
Erika
Friday, March 23, 2012
Elisabeth

Erika
Thursday, March 22, 2012
Friday, March 16, 2012
little Guy's Ties


Have a great Day!
Erika
Thursday, March 15, 2012
Thursday, March 8, 2012
QR Code Wall Hanging Quilt Along: Blocks 2 & 4
Wednesday, March 7, 2012
Enjoying Grandparents

Tomorrow I'll posts Blocks 2 & 4 of the quilt along, Stay tuned!
Erika
Thursday, March 1, 2012
QR Code Wall Hanging Quilt Along: Block 1 & 3
These blocks are the same design so it is really one design today for two blocks.
First of all here is the pattern
You will need 33 main fabric squares (black) and 16 background squares (white)
Now to sew them as a chain and save thread I will show you a technique Darlette taught me whilst making the Tokyo Subway Map quilt.
Place your squares on the table according to the block pattern. You will count your columns 1 to 7
 Place column 2 on top of column 1
Sew on the east side of the squares first row G, then F, E and so on sew chain one by one closely. Do not trim. Press to one side and you will have something like this:
(Here I have made three columns) Imagine just with 2. 
You are not clipping any rows. Sew each column to each row until you finish all the columns and you will end with 7 rows connected.
Start sewing each row and you will end with your first block.
Repeat.
Congratulations you have done your first 2 blocks! You will have something like This:
Happy Sewing!
Erika


